
Introduction
I’ve been thinking about whether to make an OpenClaw deployment tutorial, because the OpenClaw Chinese documentation is already quite detailed. However, I realized that many people might not know that Chinese documentation exists, or still find it confusing even when following the tutorial. Recently, OpenClaw has become extremely popular in China—it’s almost overhyped, like a modern-day “qigong fever.” But I still think it’s worth making a detailed tutorial so you can try deploying it yourself. After all, you won’t know if a product is right for you until you’ve tried it. The idea of having your own Jarvis-like personal AI assistant is quite appealing.
1. What is OpenClaw?
Let me give you a quick overview. OpenClaw (formerly known as Clawdbot—pretty interesting name change, right?) is an open-source AI Agent framework. Simply put, you can think of it as an “AI operating system”—it doesn’t provide AI capabilities itself, but it helps you connect to various large language models to accomplish tasks.
Unlike regular chatbots, OpenClaw can do much more:
- Operate on file systems
- Execute commands
- Write and debug code
- Search for information
- Integrate with communication tools like Feishu and Telegram
You just need to pair it with the right model, and it can help you get things done.
2. How OpenClaw Works
Let’s clarify an important concept: OpenClaw is just a “shell”—you need to provide your own model.
The workflow looks like this:
You (input) → OpenClaw → AI Model → Return resultYou can choose to connect to:
- Cloud Models: MiniMax, Qwen (Alibaba Cloud Bailian), OpenAI, Claude, and more
- Local Models: Models running locally via Ollama
Each approach has its pros and cons, which I’ll explain in detail later.
Tip: This guide includes a dedicated section on configuring Ollama local models—see Section 5.8.
3. Deployment Options and Model Choices
Official Documentation: For more advanced configuration options, check out the OpenClaw English Documentation.
Before we start installing, let’s understand the two deployment options and how to choose a model.
3.1 Deployment Options Explained
OpenClaw has two deployment options:
| Deployment | Description | Best For |
|---|---|---|
| Local Deployment | Run on your own Windows PC | Personal use, privacy-first, low cost |
| Remote Server | Run on a cloud server (e.g., Linux server) | Multi-user sharing, 24/7 operation |
This guide focuses on local deployment—running OpenClaw on your own Windows PC. While remote server deployment is convenient (vendors handle everything for you), you might actually want your own personal Jarvis on your private computer. While this comes with more risks, you’ll weigh and accept them yourself.
3.2 Which Model Should You Choose?
Before starting installation, decide which model option you’ll use. This affects the configuration steps.
Cloud APIs (Recommended for Beginners)
Call cloud model APIs with pay-as-you-go pricing (most have free tiers).
| Provider | Recommended Model | Features |
|---|---|---|
| MiniMax | M2.5 | Great cost-performance, well-optimized for Chinese |
| Qwen | qwen/qwen3-coder / qwen/qwen3-vl | Strong coding abilities, generous free tier from Alibaba Cloud |
qwen3-coder is a coding-optimized model released by Alibaba. | OpenAI | GPT-5 series | Strong all-around capabilities |
Pros: No GPU needed, fast responses, reliable capabilities Cons: Requires payment (but usually has free credits)
Local Models (Ollama)
Run models on your own computer, completely free, but requires specific hardware.
Pros: Zero cost, better privacy Cons: Requires a capable GPU, response speed depends on hardware
Honestly, most computers can’t really handle this. You can check your GPU configuration. Even the workstation in our lab didn’t go with the Ollama solution—the main issue isn’t just VRAM being enough to run, you also can’t ignore speed. Plus, my setup is already pretty powerful, but I still didn’t choose Ollama. The API solution is pretty good—you just pay a little.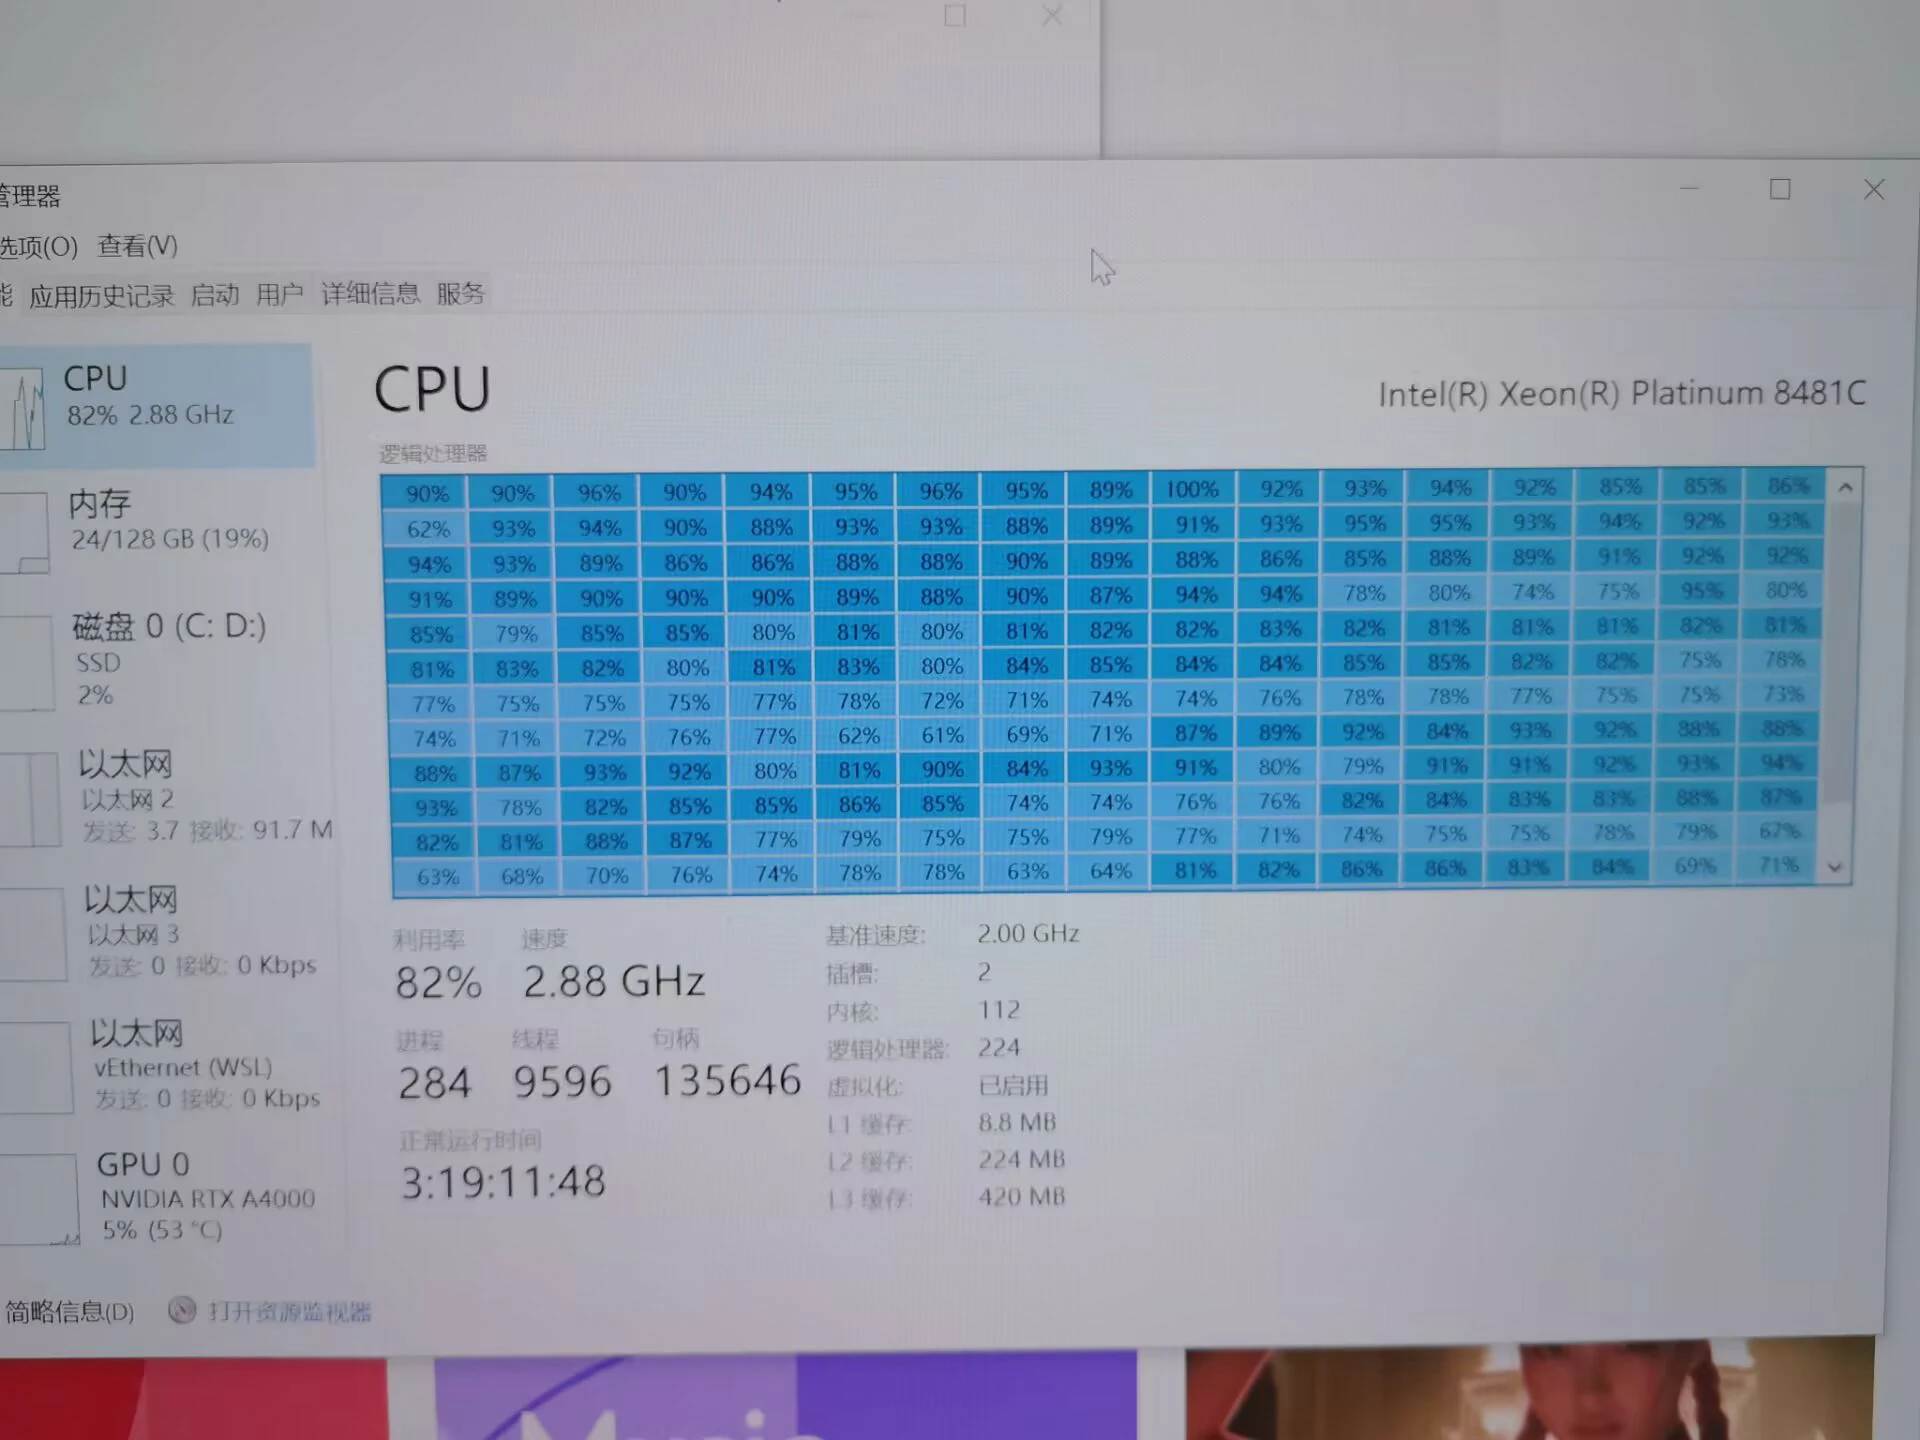
My Suggestion: Beginners should just use a remote API—MiniMax or Qwen works great. Once configured, you can start using it in 5 minutes.
3.3 How to Choose the Right LLM
Choosing an LLM mainly depends on these factors:
| Factor | Description |
|---|---|
| Price | Cloud APIs charge per usage; different models vary greatly in price |
| Speed | Response speed depends on model size and network |
| Context Length | How much text it can process; longer = more expensive |
| Coding Ability | Some models are specifically optimized for programming |
| Reasoning Ability | Ability to solve complex problems |
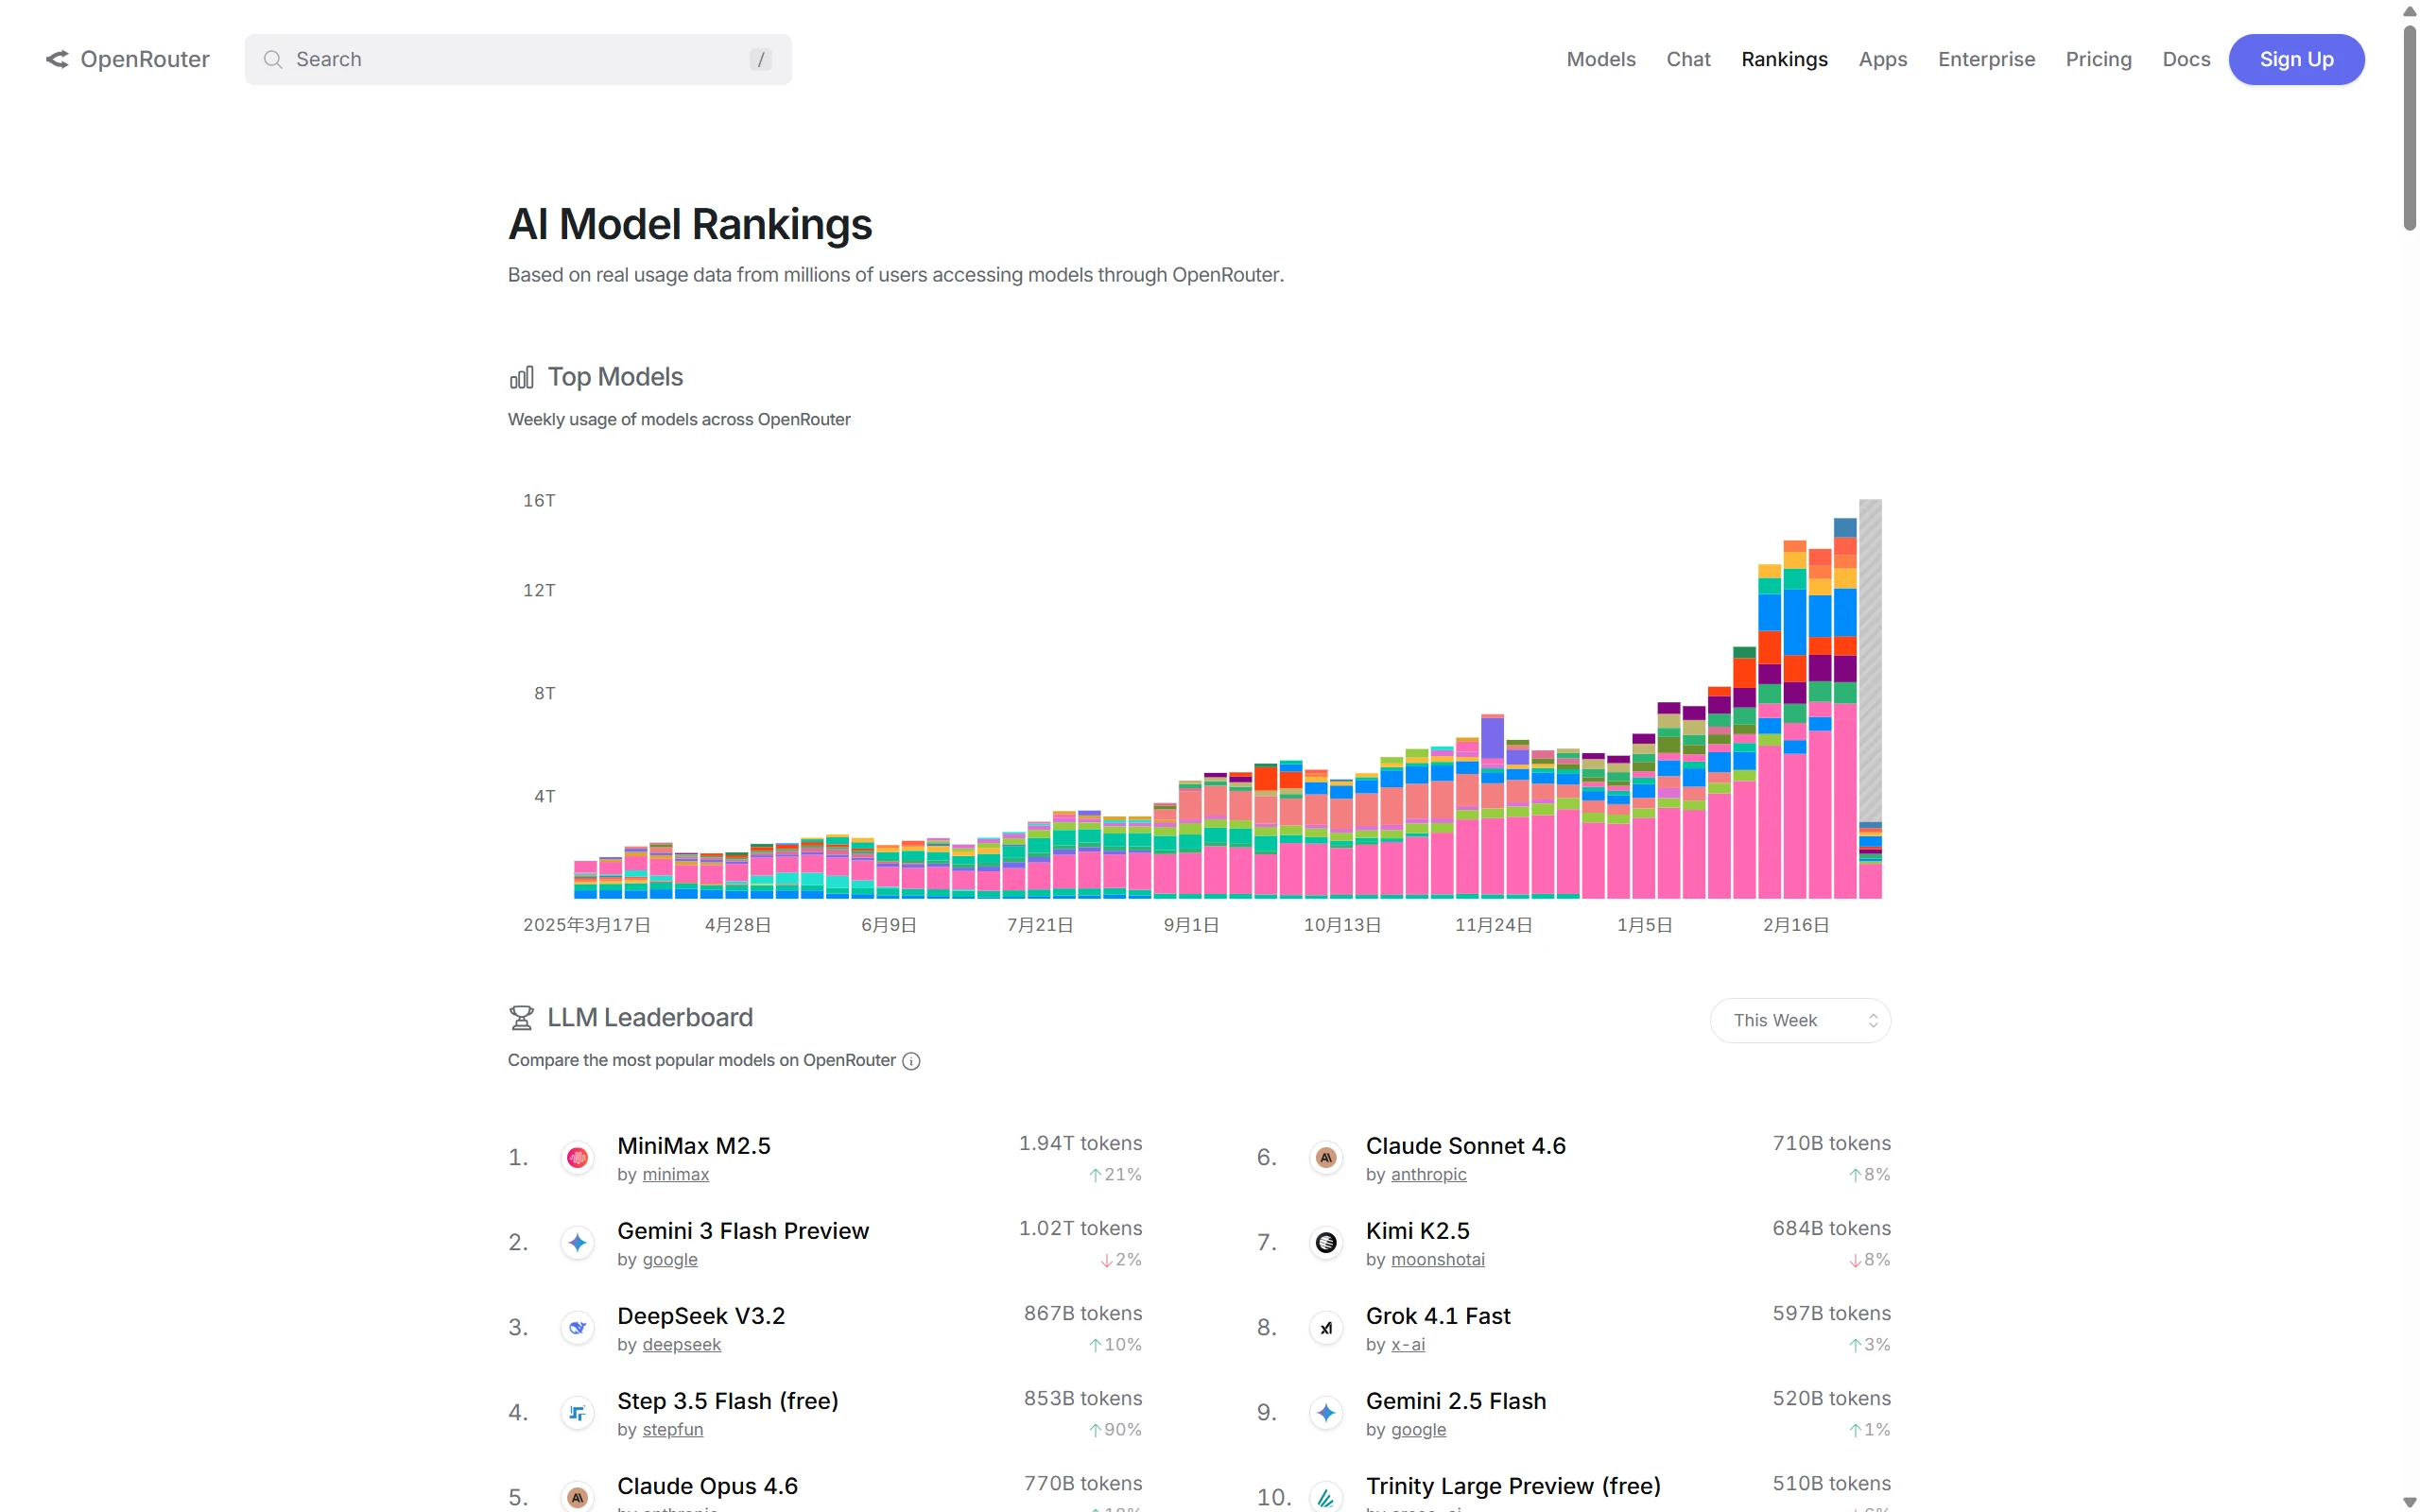
Using the OpenRouter Rankings
OpenRouter provides a convenient Model Rankings page where you can filter by:
- Performance: Overall benchmark scores
- Price: Sorting by input/output prices
- Context Length: Maximum supported tokens
- Latency: Response speed
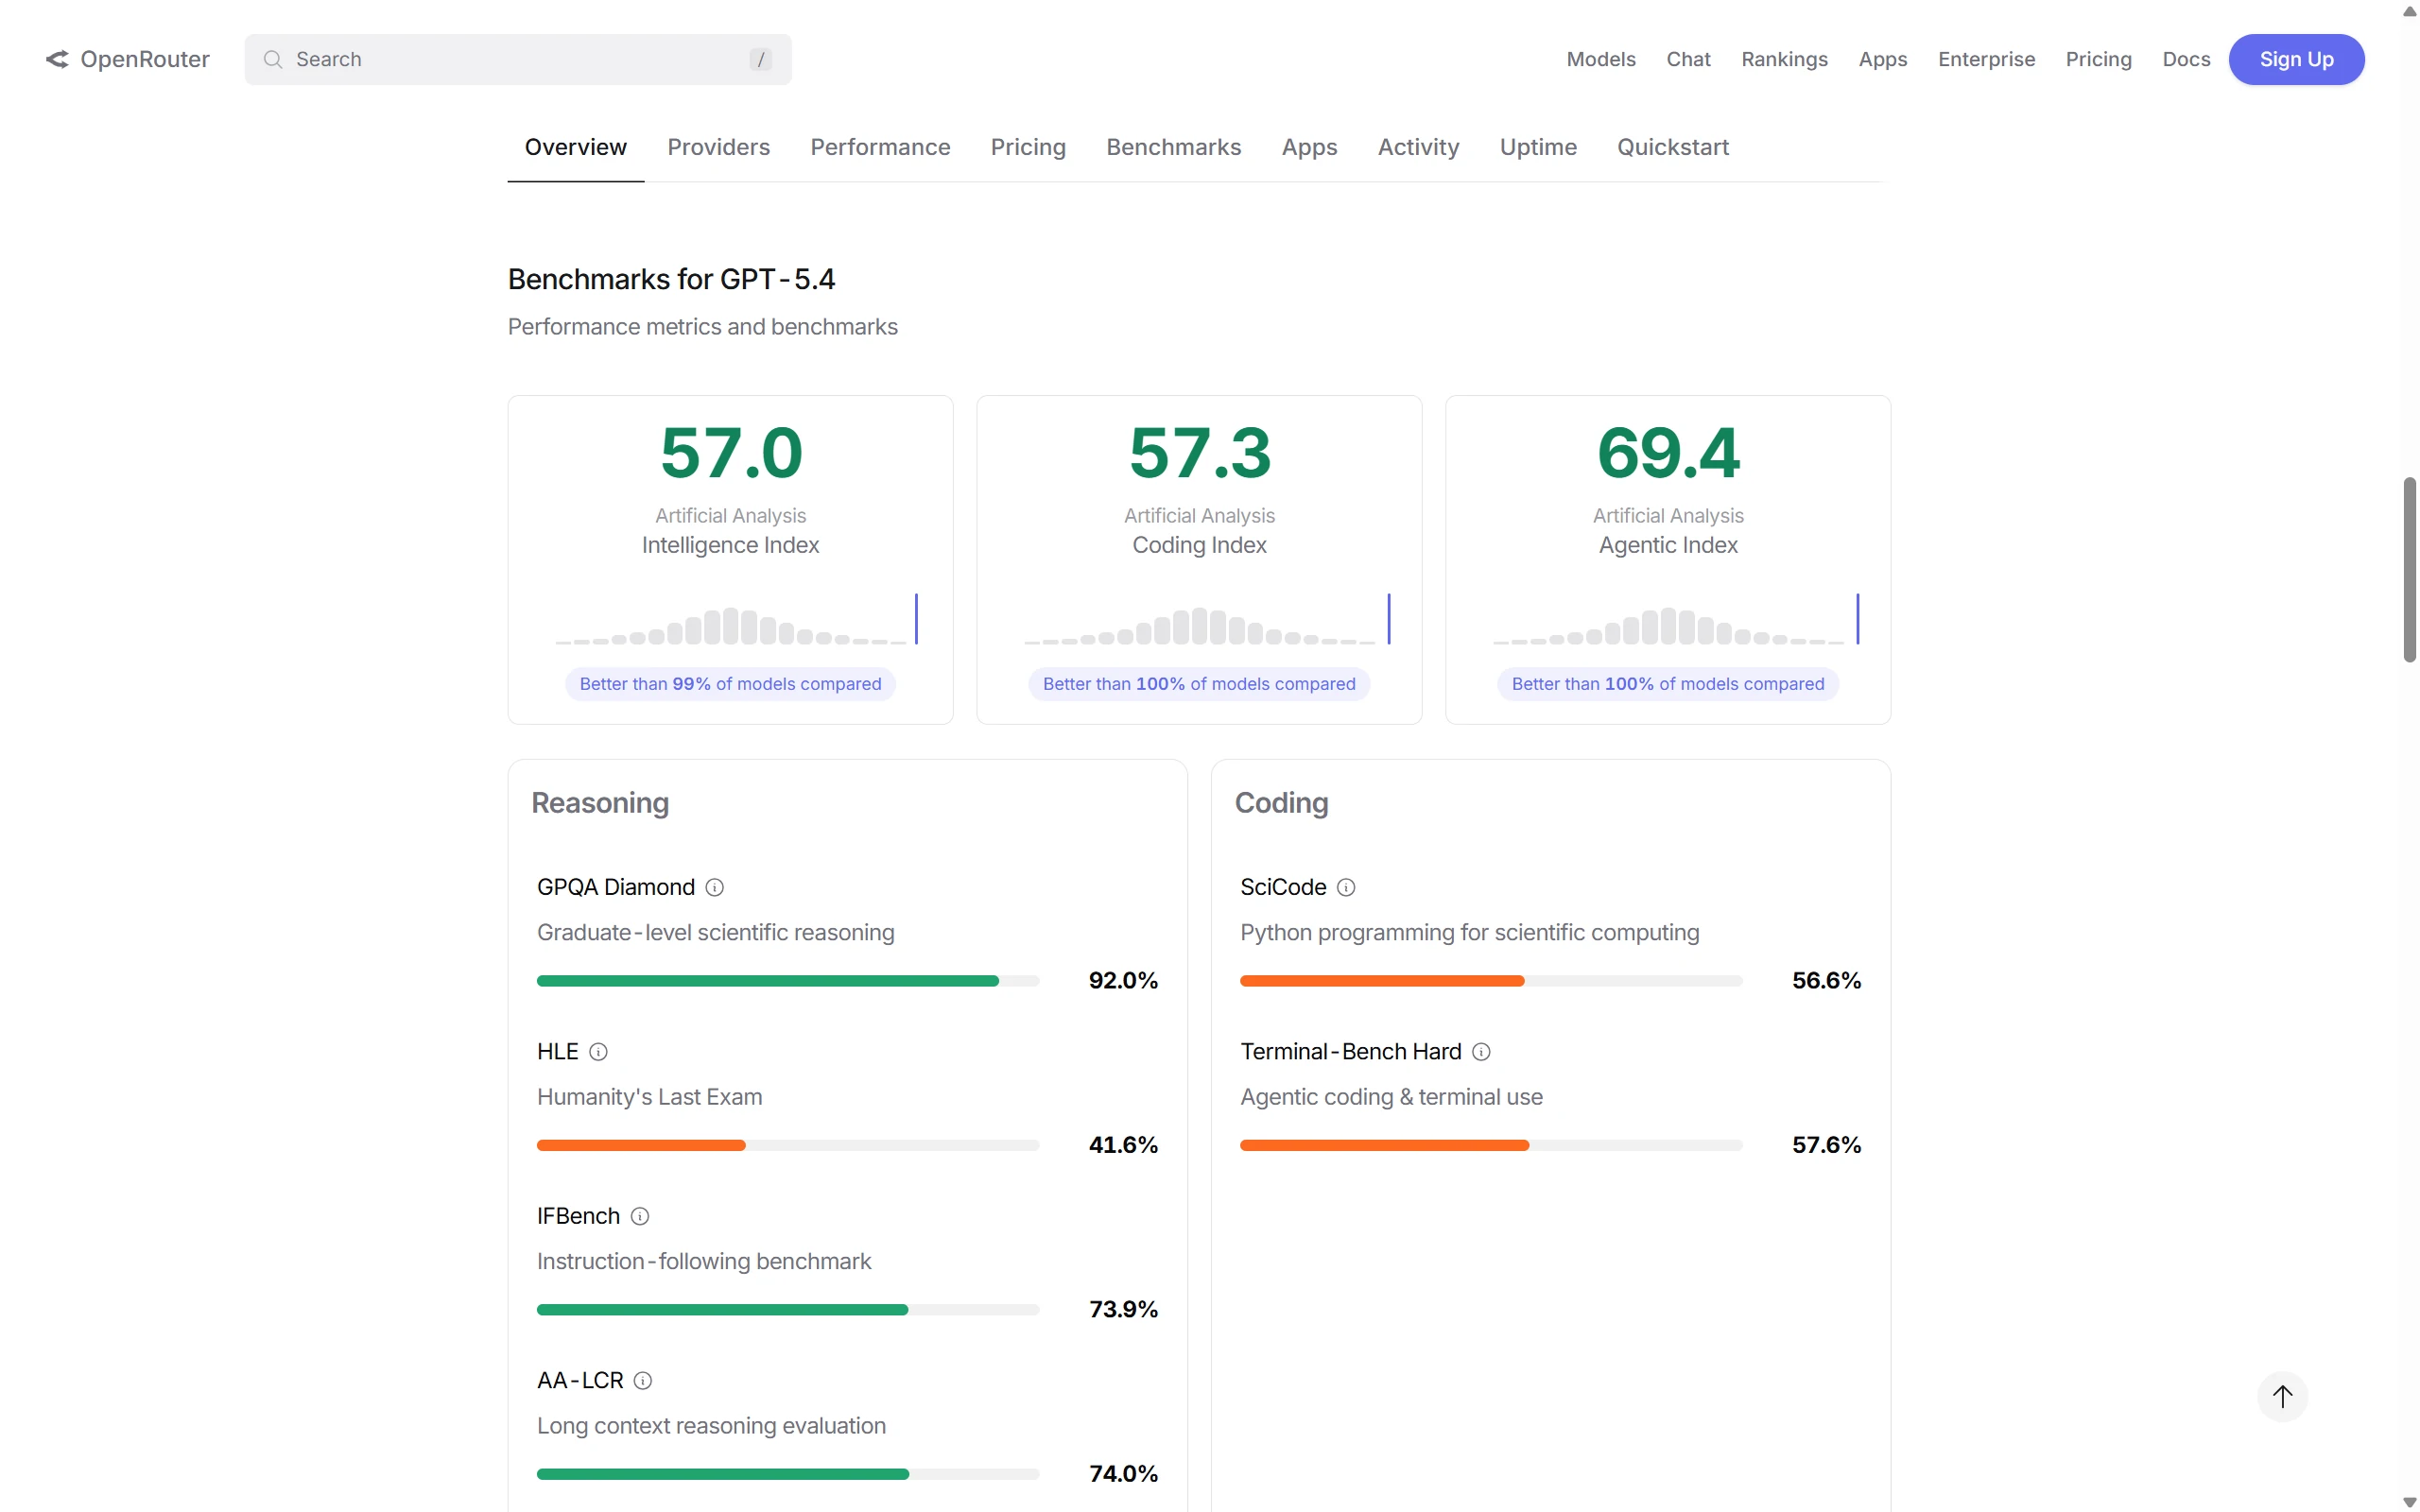
When searching for a specific model on OpenRouter, you can view:
-
Benchmarks: Capability scores in various areas
-
Pricing: Input and output prices
-
Context Length: Supported context length
Note: Different ranking systems may use different evaluation methods. For example, some rankings emphasize coding benchmarks while ignoring multimodal capabilities or long context abilities. Rankings should only be used as a reference.
Also, there’s the issue—you can’t ignore pricing just because of model capability. Check your bill later and you’ll be shocked! 
Recommended Models with Excellent Overall Performance:
| Model | Features |
|---|---|
| GPT-5 series | Strong all-around, suitable for various scenarios |
| Claude 4 Sonnet series | Strong long context, great for handling long texts |
| qwen/qwen3-coder | Strong coding ability, generous free tier |
| DeepSeek V3 / V3.2 | Strong overall capability, great cost-performance |
| Gemini 3 Flash series | Fast speed, affordable price |
| Gemini series | Strong all-around, excellent at multimodal tasks |
Coding Model Recommendations
If you’re mainly using OpenClaw for programming assistance, here’s how each model performs:
Most capable coding models:
- Claude Opus (including Claude 4 Opus series) usually performs exceptionally well on coding tasks
- However, there are limitations:
- Higher price
- May be unstable to access in China
- Not as well-optimized for Chinese as domestic models
If you’re interested, check out the OpenClaw Official Anthropic Configuration Documentation.
More practical choices for Chinese users:
| Model | Features |
|---|---|
| MiniMax M2.5 | Good Chinese understanding, great cost-performance |
| qwen/qwen3-coder | Alibaba’s coding-specific model, generous free tier |
| DeepSeek V3 / V3.2 | Strong overall capability, great cost-performance |
DeepSeek V3 / V3.2 is the current flagship model in the DeepSeek series with excellent overall capabilities.
Summary: If your network conditions allow and budget is sufficient, Claude Opus is the strongest choice. Otherwise, MiniMax M2.5, qwen/qwen3-coder, or DeepSeek V3/V3.2 are more practical options.
Google Gemini series is also very strong in overall capabilities and multimodal tasks. For example, Nano Banana in the Gemini ecosystem performs exceptionally well in image generation and visual content creation. If your needs involve image generation or multimodal understanding, consider the Gemini series.
Tip: Beginners are recommended to start with MiniMax or Qwen—once configured, you can use it in 5 minutes.
4. Windows Installation Steps
Quick Installation (Recommended)
If you just want to try OpenClaw quickly, you can use the official quick install method. Only two steps!
Step 1: Install OpenClaw
npm install -g openclaw@latestStep 2: Run the Setup Wizard
openclaw onboard --install-daemonThis command will automatically:
- Initialize OpenClaw configuration
- Install the Gateway service
- Create default config files
- Start the OpenClaw service
Yes, you read that right—just these two commands complete the basic installation!
After installation, you can:
- Run interactive chat:
openclaw - Open the web interface:
openclaw dashboard - Configure models: Follow Chapter 5 to configure your preferred models for OpenClaw
Official Documentation: For more details, check out the OpenClaw Official Documentation, especially the Quick Start section.
If you want to understand the complete OpenClaw installation process and what each step does, continue reading the advanced installation tutorial below.
Now let’s start the installation. Just follow the steps in order.
4.1 Environment Preparation
You need to have Node.js installed first (LTS version recommended, 22 or higher).
Installing Node.js
Method 1: Direct Installation
- Visit Node.js Official Website
- Download Windows Installer (.msi)
- Click Next through the wizard
- If you encounter network issues, refer to my other article: Node.js detailed installation steps.
Method 2: nvm (Recommended for managing multiple versions)
# Install nvm for Windows
# Visit https://github.com/coreybutler/nvm-windows/releases to download

# After installation, run in PowerShell:
nvm install 22
nvm use 22
Verify:
node -v
# Should show v22.x.x

npm -v
# Should show 8.x.x
Switch npm Registry (Recommended for China Users)
npm config set registry https://registry.npmmirror.comInstall Git (Optional but Recommended)
Some skills depend on Git—it’s recommended to install:
- Visit Git Official Website
- For configuration issues, refer to my article: Git Configuration
- Download and install, click Next through the wizard
4.2 Modify Execution Policy
Windows doesn’t allow running scripts by default—you need to change this setting. Open PowerShell as Administrator and run:
Set-ExecutionPolicy -ExecutionPolicy RemoteSigned -Scope CurrentUserType Y to confirm.
4.3 Run the Installation Script
Now you can install OpenClaw. Execute in PowerShell:
iwr -useb https://openclaw.ai/install.ps1 | iexWait a moment—the script will automatically:
- Detect Node.js environment
- Download and install OpenClaw
- Configure PATH
When you see “OpenClaw installed successfully”, it’s done.
4.4 Setup Wizard
The first run will enter the wizard:
openclaw onboardThe process goes like this:
- Risk warning → Type
yes - Configuration mode → Select
QuickStart - Model selection → Skip for now, configure manually later
- Channel selection → Skip for now
- Skills package → Select
No
4.5 Verify Installation
You can verify the installation:
# Check version
openclaw --version

# Check status
openclaw status

# Run diagnostics
openclaw doctor

# Open web panel
openclaw dashboard
openclaw dashboard will start a local web page, default at http://localhost:8080. You can visually configure it in your browser.
5. Configuring AI Models
Just installing doesn’t mean it’s ready to use—you need to connect it to a model. Below are instructions for several popular options.
Official Documentation: For more configuration details, check out the OpenClaw Official Documentation, which has more detailed provider configuration guides and troubleshooting tips.
5.1 Must-Read Before Configuration: API Concept Explanation
Before configuring models, let me explain some key concepts:
| Concept | Description | Example |
|---|---|---|
| Provider | Company or platform providing AI model services | MiniMax, Alibaba Cloud, OpenRouter |
| Base URL | Address of the API server | https://api.minimaxi.com/v1 |
| API Key | Key to access the API, like a “password” | sk-xxxxxx |
| Model ID | Name of the specific model | MiniMax-M2.5, qwen-plus |
| Config JSON | JSON format for configuration info | Structured config containing the above fields |
Why do you need to configure these?
OpenClaw needs to know:
- Where to find the model (Base URL)
- What credentials to use (API Key)
- Which specific model to use (Model ID)
Recommended: Using cc-switch to Manage Multiple Providers
If you plan to configure multiple model providers, it’s recommended to use cc-switch to manage them:
- Multi-Provider Management: One interface to manage all API configurations
- One-click Switching: Switch between different models anytime without manually changing config
- Auto Environment Variables: OpenClaw automatically reads environment variables set by cc-switch
Tip: See Chapter 6 for a detailed introduction to cc-switch. If you don’t want manual configuration, you can skip this chapter’s provider configuration and directly read the cc-switch section.
Configuration Method Overview
There are three ways to configure models:
| Method | Difficulty | Best For |
|---|---|---|
| Method 1: CLI Commands | Medium | Users familiar with command line |
| Method 2: Edit Config File | Harder | Users needing batch configuration |
| Method 3: Web Page Config (Recommended) | Easy | Beginner users |
If you’re not familiar with the command line, Web Page Configuration (Method 3) is recommended—visual interface is easier to get started. See details below in section 5.8.
5.2 Configure MiniMax
MiniMax’s M2.5 is quite good—great cost-performance.
Get API Key
- Visit MiniMax Open Platform
- Register → Real-name authentication
- Go to “API Keys” → Create Key
- Copy and save—you can only see it once
Configuration Command
# Configure MiniMax
openclaw config set 'models.providers.minimax' --json '{
  "baseUrl": "https://api.minimaxi.com/v1",
  "apiKey": "your_MiniMax_API_Key",
  "api": "openai-completions",
  "models": [
    { "id": "MiniMax-M2.5", "name": "MiniMax M2.5" },
    { "id": "MiniMax-M2.5-highspeed", "name": "MiniMax M2.5 High Speed" }
  ]
}'

# Set as default model
openclaw models set minimax/MiniMax-M2.5
Safer Approach: Environment Variables
Store the key in environment variables instead of writing it in config:
# Temporary (only valid for current terminal)
$env.MINIMAX_API_KEY = "your_Key"

# Or permanent
[System.Environment]::SetEnvironmentVariable("MINIMAX_API_KEY", "your_Key", "User")
When configuring, use $MINIMAX_API_KEY instead of the actual key.
MiniMax Coding Plan (Recommended for Programmers)
If you mainly use it for programming, MiniMax offers a dedicated Coding Plan with better cost-performance.
Get API Key and Activate Coding Plan:
- Visit MiniMax Open Platform
- Register → Real-name authentication
- Go to “API Keys” → Create Key
- Go to “Coding Plan” page, activate Coding Plan
- Copy and save the API Key
Configuration Command:
# Configure MiniMax Coding Plan
openclaw config set 'models.providers.minimax' --json '{
  "baseUrl": "https://api.minimaxi.com/v1",
  "apiKey": "your_MiniMax_API_Key",
  "api": "openai-completions",
  "models": [
    { "id": "MiniMax-M2.5", "name": "MiniMax M2.5" },
    { "id": "MiniMax-M2.5-highspeed", "name": "MiniMax M2.5 High Speed" }
  ]
}'

# Set as default model
openclaw models set minimax/MiniMax-M2.5Tip: Coding Plan usually has lower calling prices, suitable for high-frequency users.
5.3 Configure Alibaba Cloud Model Studio
Alibaba Cloud Model Studio is a large model service platform provided by Alibaba Cloud, which you can use to access Qwen models and more. Besides the standard version, there’s also a dedicated Coding Plan for programming users.
Get API Key
- Visit Alibaba Cloud Model Studio
- Register → Real-name authentication
- Go to “API Keys” → Create Key
- Copy and save
Activate Coding Plan (Recommended for Programmers)
- Visit Alibaba Cloud Bailian
- Go to “Coding Plan” page
- Activate Coding Plan
- Get the dedicated Coding Plan API Key
Configuration Command
Standard Version:
# Configure Alibaba Cloud Model Studio
openclaw config set 'models.providers.qwen' --json '{
  "baseUrl": "https://dashscope.aliyuncs.com/compatible-mode/v1",
  "apiKey": "your_Alibaba_Cloud_API_Key",
  "models": [
    { "id": "qwen/qwen3-coder", "name": "Qwen Coder Model" },
    { "id": "qwen-portal/vision-model", "name": "Qwen Vision Model" },
    { "id": "qwen-plus", "name": "Qwen Plus" },
    { "id": "qwen-max", "name": "Qwen Max" }
  ]
}'

# Set as default
openclaw models set qwen/qwen/qwen3-coder
Coding Plan Version (if using Alibaba Cloud Coding Plan):
openclaw config set 'models.providers.qwen' --json '{
  "baseUrl": "https://coding.dashscope.aliyuncs.com/v1",
  "apiKey": "your_Coding_Plan_Key",
  "models": [
    { "id": "qwen3-max-2026-01-23", "name": "Qwen3 Max" },
    { "id": "MiniMax-M2.5", "name": "MiniMax M2.5" }
  ]
}'Tip: Coding Plan usually has lower calling prices or free credits, suitable for high-frequency programming users.
5.4 Configure OpenRouter
OpenRouter is a platform that aggregates hundreds of AI models. Through it, you can use a single API Key to access GPT, Claude, DeepSeek, and many other models.
Get API Key
- Visit OpenRouter Official Website
- Register account
- Go to “API Keys” → Create Key
- Copy and save—you can only see it once
Configuration Command
openclaw config set 'models.providers.openrouter' --json '{
  "baseUrl": "https://openrouter.ai/api/v1",
  "apiKey": "your_OpenRouter_API_Key",
  "models": [
    { "id": "openai/gpt-5", "name": "GPT-5" },
    { "id": "anthropic/claude-4-sonnet", "name": "Claude 4 Sonnet" },
    { "id": "deepseek/deepseek-v3", "name": "DeepSeek V3" },
    { "id": "google/gemini-3-flash", "name": "Gemini 3 Flash" }
  ]
}'

# Set as default
openclaw models set openrouter/openai/gpt-5Note: Model IDs on OpenRouter are formatted differently than direct calls—the format is
provider/modelname, likeopenai/gpt-5,anthropic/claude-4-sonnet.
Reference: Check the OpenRouter Rankings to see model ratings and price rankings as a reference for selection.
5.5 Configure SiliconFlow
SiliconFlow is a domestic AI model aggregation platform in China, offering various model interfaces and is quite friendly for China users.
Features
- Fast domestic access: Servers in China, low latency
- Many model options: Supports Qwen, DeepSeek, Llama, and more
- Affordable pricing: Pay-per-use with free credits
Configuration Reference
For detailed configuration tutorials, refer to the official documentation:
Basic steps:
- Visit SiliconFlow Official Website to register
- Get API Key
- Configure provider by referring to official docs
5.6 Configure OpenAI
If you have an OpenAI API Key, you can configure it directly.
Get API Key
- Visit OpenAI Platform
- Go to “API Keys” → Create Key
- Copy and save
Note: China users may need to use a VPN to access OpenAI.
Configuration Command
openclaw config set 'models.providers.openai' --json '{
  "apiKey": "your_OpenAI_API_Key",
  "models": [
    { "id": "gpt-5", "name": "OpenAI GPT-5" },
    { "id": "gpt-4o", "name": "GPT-4o" },
    { "id": "gpt-4o-mini", "name": "GPT-4o Mini" }
  ]
}'

# Set as default
openclaw models set openai/gpt-5
5.7 Configure Qwen OAuth (Recommended)
Qwen OAuth is the most recommended configuration method because it has free credits and doesn’t require manually getting an API Key—just authorize with your Alibaba Cloud account.
Configuration Steps
-
Run the configuration wizard:
openclaw onboard -
When selecting model provider, choose Qwen
-
Select Qwen OAuth
-
A browser window will pop up for you to log in with your Alibaba Cloud account for authorization
-
After successful authorization, select the model you want to use:
qwen/qwen3-coder: Coding-specificqwen-portal/vision-model: Vision understanding
Manual Configuration (if wizard fails)
# Run OAuth authorization
openclaw config set oauth qwen
This will open a browser for you to complete the authorization process. After authorization completes, the configuration is saved automatically.
5.8 Configure Ollama Local Models
If you have a GPU and want to run models locally (zero API fees), you can use Ollama.
Important Concept: Ollama is responsible for running models locally, while OpenClaw needs to connect to Ollama through the Gateway.
5.8.1 Install Ollama
- Visit Ollama Official Website
- Download the Windows version
- Run the installer—it will start automatically
If Ollama website is inaccessible, try these domestic mirror sources:
Ollama defaults to listening at http://localhost:11434.
For China Users: If you’re in Mainland China, you may encounter slow download speeds or unstable connections when downloading models. It’s recommended to configure a domestic mirror source (see below), which can significantly improve download speed.
Configure Domestic Mirror Sources (Optional, Recommended for China)
Domestic Mirror List:
| Mirror Site | Address |
|---|---|
| ModelScope | https://ollama.modelscope.cn |
| DeepSeek | https://ollama.deepseek.com |
| Zhejiang University | https://ollama.zju.edu.cn |
| Domestic Collection | https://www.newbe.pro/Mirrors/Mirrors-ollama |
Configuration method (Windows):
# Temporary effect
set OLLAMA_HOST=https://ollama.modelscope.cn

# Permanent effect
setx OLLAMA_HOST https://ollama.modelscope.cn
Linux / macOS:
export OLLAMA_HOST=https://ollama.modelscope.cnAfter configuration, you can use commands like ollama pull qwen3 to download models. If download succeeds, the mirror is working.
Quick Tip: If a mirror download fails, try switching to another mirror source.
5.8.2 Download Models
VRAM Note: Larger models require more VRAM. 3B models need about 4-6GB VRAM, 8B models need about 8-12GB VRAM. Choose a suitable model based on your GPU.
Choose based on your PC configuration:
| PC Configuration | Recommended Model |
|---|---|
| Entry-level (no discrete GPU or VRAM < 4GB) | phi3:mini, qwen2.5:1.8b |
| Mainstream (4-6GB VRAM) | qwen2.5:3b, qwen2.5-coder:3b, qwen3:4b |
| Mid-to-high end (8GB+ VRAM) | qwen3:8b, qwen3:14b |
Tip: If Ollama doesn’t support Qwen3 yet, Qwen2.5 is still a great alternative.
# Check available models
ollama list

# Entry-level model (can run on CPU)
ollama pull phi3:mini

# Mainstream config - Chat model (recommended)
ollama pull qwen2.5:3b

# Mainstream config - Coding model
ollama pull qwen2.5-coder:3b

# Mid-to-high end - Stronger capability
ollama pull qwen3:8bTip: If VRAM isn’t enough, Ollama will automatically use a quantized version, or you can manually pull a quantized version like
qwen2.5:3b-q4_K_M, which uses less VRAM.
5.8.3 Configure OpenClaw to Connect to Ollama
Configure OpenClaw to connect to local Ollama through Gateway:
openclaw config set 'models.providers.ollama' --json '{
  "baseUrl": "http://localhost:18789/v1",
  "apiKey": "ollama-local",
  "models": [
    { "id": "qwen2.5:3b", "name": "Qwen 2.5 3B" },
    { "id": "qwen2.5-coder:3b", "name": "Qwen 2.5 Coder 3B" },
    { "id": "qwen3:8b", "name": "Qwen 3 8B" },
    { "id": "phi3:mini", "name": "Phi-3 Mini" }
  ]
}'

# Set as default (3B model recommended; use qwen3:8b if you have 8GB+ VRAM)
openclaw models set ollama/qwen2.5:3bNote: The Gateway address here is
http://localhost:18789(the port you specified when starting Gateway), not Ollama’s direct port11434. This allows OpenClaw to centrally manage all model connections.
5.8.4 What is Gateway?
Gateway is OpenClaw’s backend service. You can think of it as a “translator”—OpenClaw talks to various models through it.
Simply put:
- Gateway is responsible for centrally managing connections to various models
- Gateway is responsible for handling authentication
- Gateway is responsible for forwarding requests to different model providers
Architecture Diagram:
You
   ↓
OpenClaw CLI (where you enter commands)
   ↓
Gateway (manages connections)
   ↓
Model Providers
(MiniMax / Qwen / OpenRouter / Ollama)
Why is Gateway needed? Through Gateway as a unified entry point, OpenClaw can conveniently connect to various different model providers without configuring separate connection methods for each model.
5.8.5 Install Gateway
Gateway is usually automatically included when you install OpenClaw. If you need to install separately:
npm install -g @openclaw/gateway5.8.6 Start Gateway
Gateway is OpenClaw’s core running process, responsible for:
- Managing model connections
- Providing HTTP / WebSocket API
- Providing web control interface
Start Gateway (Recommended)
The simplest way is to run:
openclaw gateway runThis command starts the Gateway service. After starting, the default is:
http listener: //127.0.0.1:18789You can open this address in your browser to access the web control interface for model configuration.
Common Parameters
If you need customization, you can use these parameters:
| Parameter | Function | Example |
|---|---|---|
--port | Specify port number | --port 8080 |
--verbose | Show detailed logs for troubleshooting | --verbose |
--force | Force occupy the port | --force |
Examples:
# Start with specified port
openclaw gateway run --port 8080

# Show detailed logs
openclaw gateway run --verbose

# Force occupy when port is in use
openclaw gateway run --force
5.8.7 Advanced Configuration (Optional)
If you want to further customize Gateway:
| Option | Description |
|---|---|
--hot-reload | Enable hot-reload, no restart needed for config changes |
SIGUSR1 | Send signal to restart Gateway (Linux/macOS) |
--config | Specify config file path |
Example:
# Hot-reload mode
openclaw gateway --port 18789 --hot-reload
Method 1: CLI Command Configuration
Use openclaw config set command to directly configure model parameters.
# Syntax
openclaw config set 'models.provider_name' --json '{
  "baseUrl": "https://api.example.com/v1",
  "apiKey": "your_API_Key",
  "models": [
    { "id": "model_id", "name": "display_name" }
  ]
}'
Example (Configuring MiniMax):
openclaw config set 'models.providers.minimax' --json '{
  "baseUrl": "https://api.minimaxi.com/v1",
  "apiKey": "your_MiniMax_API_Key",
  "api": "openai-completions",
  "models": [
    { "id": "MiniMax-M2.5", "name": "MiniMax M2.5" }
  ]
}'Pros: Fast, good for automation scripts Cons: Need to remember command syntax
Method 2: Edit Config File
Directly edit OpenClaw’s config file claude.json.
Config file location:
- Windows:
%USERPROFILE%\.openclaw\claude.json - macOS/Linux:
~/.openclaw/claude.json
Example Config:
{
  "models": {
    "providers": {
      "minimax": {
        "baseUrl": "https://api.minimaxi.com/v1",
        "apiKey": "your_MiniMax_API_Key",
        "api": "openai-completions",
        "models": [
          { "id": "MiniMax-M2.5", "name": "MiniMax M2.5" }
        ]
      }
    }
  }
}Pros: Batch configuration easy, easy to backup Cons: Need to manually edit JSON format
Method 3: Web Page Configuration (Recommended for Beginners)
Besides command line and config files, you can also configure models through the Web Interface. This method is more intuitive and suitable for beginners.
Step 1: Start Gateway
Gateway not only provides API services but also has a built-in web control interface. Run in terminal:
openclaw gateway runThis command starts the Gateway service and runs in the background.
Step 2: Open Browser to Access
Gateway’s web interface default address is:
http://127.0.0.1:18789Open this address in your browser—you’ll see the Gateway management interface.
Step 3: Enter Configuration Page
Find and click in the interface:
Config → Models
Here you can manage all model configurations.
Step 4: Add Provider Configuration
Taking adding MiniMax as an example:
- Click Add Provider or similar button
- Select or fill in Provider type
- Fill in the following information:
| Field | Value |
|---|---|
| Base URL | https://api.minimaxi.com/v1 |
| API Key | Your MiniMax API Key |
- Enable Auth Header option (if needed)
- Fill in API Key
Step 5: Save Configuration
Click Save or Update button to save the configuration.
Tip: After saving, Gateway will automatically refresh the config. You may need to restart OpenClaw for changes to take effect.
The benefits of this method:
- Visual operation, no need to remember commands
- See configuration status in real-time
- Suitable for users unfamiliar with command line
6. Using cc-switch to Manage APIs (Recommended)
If you’ve configured multiple model providers, manually changing config each time can be tedious. cc-switch is a cross-platform desktop tool that helps you switch between different AI API configurations with one click. It supports Claude Code, OpenClaw, Gemini, and more.
6.1 Why Use cc-switch?
Problems with manually managing API Keys:
- Need to separately configure environment variables for each provider
- Switching models requires modifying JSON config
- Easy to get confused with multiple accounts/providers
cc-switch advantages:
- Visual interface, no need to edit command line configs
- One-click provider switching
- Supports MCP server management
- Supports Skills/Prompts presets
6.2 How cc-switch Works
Important: cc-switch writes the currently enabled provider configuration to environment variables. When OpenClaw starts, it automatically reads these environment variables, so you don’t need to manually edit OpenClaw’s config file.
This is the convenience of cc-switch: you just switch the provider in cc-switch, then start OpenClaw, and it will automatically use the current configuration.
6.3 Install cc-switch
Windows:
- Visit cc-switch GitHub Releases
- Download
CC-Switch-v{version}-Windows.msior portable version - Run the installer
macOS:
brew tap farion1231/ccswitch
brew install --cask cc-switchLinux:
Supports .deb, .rpm, .AppImage and other formats.
6.4 Add Provider
- Start cc-switch
- Click ”+” in the top right or “Add Provider”
- Select preset provider (MiniMax, Qwen, etc.)
- Fill in your API Key
- Click “Add”
6.5 Switch Provider
- In the main interface, select the provider you want to use
- Click “Enable”
- Restart OpenClaw (if it’s running)
6.6 OpenClaw Automatically Uses Current Config
cc-switch writes the currently enabled provider configuration to environment variables. When OpenClaw starts, it automatically reads these environment variables, so you only need to:
# After switching provider, restart OpenClaw
openclaw restart
# or
openclaw serve
OpenClaw will automatically use the API configuration currently enabled in cc-switch.
7. Starting and Using
After configuring the model, you’re ready to use it.
# Interactive chat
openclaw

# Start web service
openclaw serve --port 3000

# Start Gateway (if not auto-started)
openclaw gateway run

# Web panel
openclaw dashboard
Just type text to chat. If tools are configured, it can also help you operate files, search for information, and more.
8. Recommended Configurations
For different scenarios, here’s a reference:
| Scenario | Recommended Model | Reason |
|---|---|---|
| Programming | qwen/qwen3-coder | Specifically optimized for coding, good GitHub integration |
| Vision Understanding | qwen-portal/vision-model | Supports image understanding |
| Daily Chat | MiniMax-M2.5 | Good Chinese understanding, great cost-performance |
| Deep Reasoning | Qwen3-Max | Strong capability |
| Local Offline | Ollama qwen2.5:3b | Mainstream config usable, completely free |
My usual combo: Use MiniMax for daily use, switch to qwen/qwen3-coder for programming.
Switching models is easy:
# Switch to MiniMax
openclaw models set minimax/MiniMax-M2.5

# Switch to Qwen for programming
openclaw models set qwen/qwen/qwen3-coder

# Switch to Qwen Vision
openclaw models set qwen/qwen-portal/vision-model
9. Common Issues
Command Not Found
# Check if installed
npm list -g openclaw

# Restart PowerShell and try again

# If still not working, reinstall
npm install -g openclaw@latest
API Key Error
- Check if Key is correct, no extra spaces
- Check if there’s still balance
- Recommended to use environment variable method
Ollama Connection Failed
# Confirm Ollama is running
ollama list

# Try accessing
curl http://localhost:11434
Gateway Connection Failed
# Confirm Gateway is running
openclaw gateway run

# If port is occupied, add --force to force start
openclaw gateway run --force

# Or specify another port
openclaw gateway run --port 8080
Response Too Slow
- Remote API: Check network, or try another model
- Ollama: Consider using smaller models like
qwen2.5:3bor quantized versionqwen2.5:3b-q4_K_M
Installation Script Error
Confirm execution policy is changed:
Set-ExecutionPolicy -ExecutionPolicy RemoteSigned -Scope CurrentUser10. Alternative: Tencent Workflow AI (WorkBuddy)
If you find OpenClaw deployment too complicated, consider Tencent Workflow AI (also known as WorkBuddy).
What is WorkBuddy?
WorkBuddy is an AI programming assistant released by Tencent, similar to Cursor and Windsurf products. It doesn’t require local deployment—just use VS Code or JetBrains plugins directly.
Features
- No deployment needed: Install plugin and use immediately
- Generous free credits: Tencent provides free usage quotas
- Well-optimized for Chinese: Friendly for Chinese developers
- Integrates Tencent ecosystem: Can connect to WeChat, Tencent Cloud, and other services
Who It’s For
- Programming beginners who don’t want to deal with environment setup
- Those who want a plug-and-play experience
- Those who simply want to experience AI programming assistance
Comparison with OpenClaw
| Feature | OpenClaw | WorkBuddy |
|---|---|---|
| Deployment | Local deployment | No deployment needed |
| Customization | High | Medium |
| Learning curve | Higher | Lower |
| Cost | Free/Paid | Has free credits |
Summary: If you just want to experience AI programming assistance, WorkBuddy is a simpler choice. If you want higher customization and scalability, OpenClaw is still the better choice.
Conclusion
This tutorial might still not be detailed enough, but I’ve written a very basic detailed configuration tutorial. I’ll update with more detailed LLM parameter explanations later. I may also update detailed tutorials on integrating OpenClaw with Feishu and more.
Comments
Login with GitHub to comment